
(2023 Update) How to Cure Salmon for Sushi and Sashimi
- Kaz Matsune

- Jun 18, 2019
- 9 min read
Updated: Apr 7, 2024
Video Tutorial:
Understanding Sushi Grade Salmon
"Sushi grade" is a term used to determine if fish is safe for raw consumption. But how do you transform salmon into sushi grade? For wild salmon, freezing is required, along with an optional curing step, which is highly recommended. In the case of farm-raised salmon, some may require freezing while others do not. Curing remains optional.
Given that salmon is one of the most popular fish for sushi in the US and Japan, this article aims to explain how to convert regular salmon into sushi grade for raw consumption.
Here's the step-by-step process:

Selecting the salmon
Curing
Freezing
Thawing
Choosing the Right Salmon
Finding quality salmon involves visiting a reputable local fish store or a supermarket known for high-quality fish. Ideally, you should select a store where an expert is available to answer your queries.
Some questions you might consider asking include:
When was this salmon delivered? (the fresher, the better)
Where was this salmon caught (or farm raised)?
Has this salmon been previously frozen?
Different types of salmon you may find include King Salmon/Chinook, Atlantic Salmon/Salmo Solar, Silver Salmon/Coho, Red Salmon/Sockeye, and Pink Salmon/Humpback.
Here are explanations of each salmon type.
King Salmon
As the name suggests, King Salmon is the largest variety, distinguished by its higher fat content than other types. Its flavor stands out, offering a deep and robust salmon taste, making it a favorite, especially when in season.
Atlantic Salmon
A less known fact is that all Atlantic Salmon is farmed. This variety presents a color spectrum from orange to light orange, but it falls short in terms of flavor and oil content when compared to King Salmon.
Silver Salmon/Coho
Falling mid-range in size, taste, and flavor, Silver Salmon, also known as Coho, offers a medium experience. It's larger than the smaller Red Salmon but still smaller than King. Named for its unblemished skin, it has less fat and a lighter hue than both King and Sockeye Salmon.
Red Salmon
Red Salmon ranks second in my preferences, right after King. Despite its smaller size, it boasts a rich fat content. Its flavor profile is characterized by an intense, umami taste, which may feel more concentrated. Red Salmon is predominantly wild, as farmed Red Salmon is not commonly found, making it an excellent choice for sushi-grade salmon.
Pink Salmon
Pink Salmon is the smallest variety, and consequently, it has the least fat content. Its primary use is in canned salmon production due to its lower commercial value, which is attributed to its lower fat content. It's not commonly used for sushi or sashimi, and it's rarely seen in fish company price lists or restaurant menus.
For sushi and sashimi, my preferences lie with King Salmon first, followed by Red, then Atlantic Salmon. King Salmon, with its robust fat content and deep flavor, tops my list. Red Salmon, with its distinctive concentrated flavor, comes next. Atlantic Salmon's flavor can be inconsistent; because I enjoy the taste of King and Sockeye, I often find farmed Atlantic bland. Nonetheless, Atlantic salmon is a good candidate for sushi fish.
Once you've selected your salmon variety, the next step in the process is curing.

Curing Process
Salmon curing for sushi involves two main techniques: salt curing and vinegar curing. Both methods kill and reduce bacteria on the fish's exterior. Vinegar curing mitigates the "fishy" smell and imparts a "cooked" texture to the flesh. Salt curing, especially when combined with sugar, introduces a sweet-salty flavor profile.
You'll need the following ingredients:
Salmon (skin off)
Sea Salt
Sugar
Lemon peel or zest (optional)
Instructions:
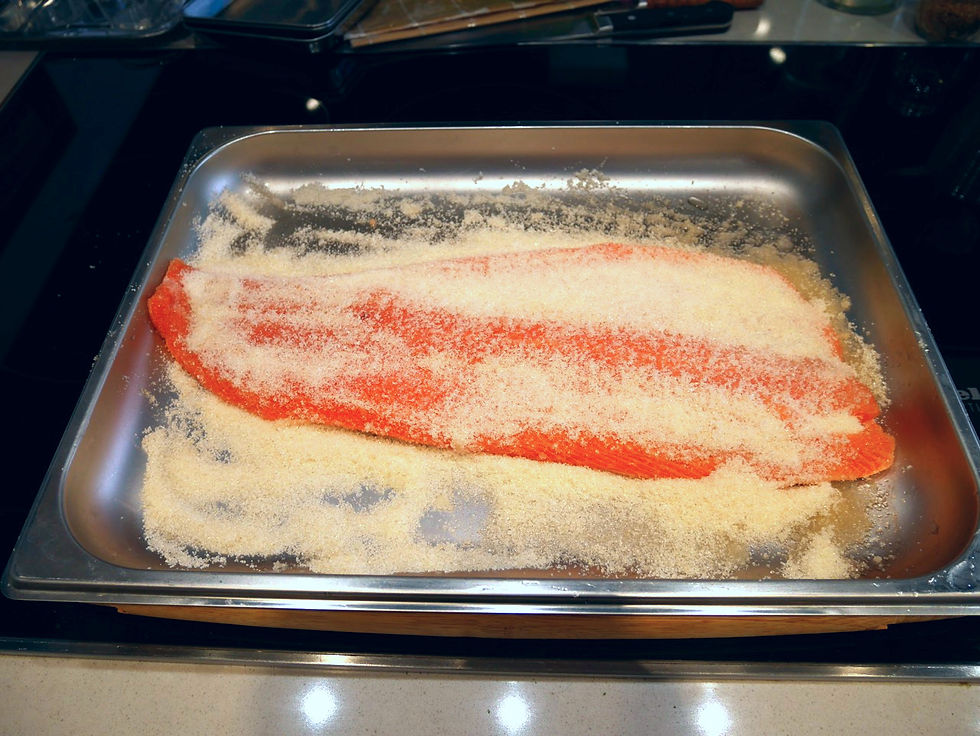
Spread sugar on a sheet pan.
Coat the entire outer layer of the salmon with sugar.
Let the salmon sit until water starts seeping out. The curing time in sugar depends on the salmon's size.
Rinse the salmon in water and pat dry with paper towels.
Repeat the process with salt.
(Optional) Place the salmon in a bag and inject smoke using a smoke gun.
Refrigerate for 30 minutes to an hour.
After curing the salmon, it's time to freeze it.
Freezing
To kill parasites like anisakis, wild salmon must be frozen. The freezing duration is approximately 24 hours in a commercial freezer, or 7 days in a home freezer. Certain farm-raised Salmon, like Ora King from New Zealand, is parasite-free and requires no freezing. Always confirm with your fishmonger when purchasing farm-raised salmon.
Thawing
After freezing, slowly thaw the salmon in your refrigerator. This slow process preserves the flavor and maintains the delicate texture of the fish.
(Quick) Smoking
This technique does not fully smoke the salmon as in the case of traditional smoked salmon. It's more of an instant smoke infusion, primarily intended to impart a smoky flavor. It's important to note that this method likely doesn't kill or reduce the bacteria on the fish's surface.

To quick-smoke, use a compact handheld smoke gun. A wide variety of these smoke guns can be found online. Click here to explore.
Instructions:
Place your thawed salmon on a metal wire rack on a sheet pan, or a plate.
Place the sheet pan in a plastic bag (small trash bag would work).
Insert the tip of the smoke gun into the plastic bag.
Inject smoke until the bag is filled.
Close the bag, place it in the refrigerator for at least 30 minutes.
Remove the salmon from the bag. Slice for sushi or sashimi.
With this guide, you can elevate your homemade sushi and sashimi experience by mastering the art of preparing salmon. Follow the steps, use high-quality ingredients like Ora King Salmon, and with practice, you'll impress your guests with wonderful sushi dishes. Happy sushi-making!
(Original) How to Cure Salmon for Sushi and Sashimi: A Step-by-Step Guide
Here is an update to the original post, “How to Cure Salmon for Sushi and Sashimi: A Step-by-Step Guide”
Sushi Grade Salmon
Sushi grade is a term used to state if fish is ok for raw consumption. The question is how can I make salmon sushi grade? If it’s wild salmon, it requires freezing, and optional curing (recommended). If farm raised, for some requires freezing, some do not. Curing is also optional.
As Salmon is one of the most popular fish for sushi in the US and Japan, in this article, I am going to explain how to turn a regular salmon into sushi grade for a raw consumption.
Let’s dive in.
Here are the steps:
Selecting the salmon
Cure
Freeze
Thaw
Selecting Salmon
To pick Salmon for sushi, find a trustworthy local fish store, or supermarket that carries quality fish. Ideally, a store where there is someone dedicated to selling fish, as you may need to ask some questions.
Some of the questions to ask.
Q: When was this salmon delivered to here? (the sooner, the better)
Q: Where was this salmon caught (or farm raised)?
Q: Is this salmon previously frozen?

There are many types of salmon available for purchase. They are:
King Salmon/Chinook
Atlantic Salmon/Salmo Solar
Silver Salmon/Coho
Red Salmon/Sockeye
Pink Salmon/Humpback
#1 King Salmon
It is the largest of its kind, hence the name King. It also contains more fat than any other salmon. As for the taste, it is the king, meaning, it has the most deep salmon flavor. When in season, wild King is my favorite. .
#2 Atlantic Salmon
I didn’t know this until recently - all Atlantic salmon are farmed. The color tends to be more orange to light orange. Has less flavor and oil compared to King Salmon.
# Silver Salmon/Coho
In terms of its size, taste and flavor, Sliver Salmon, aks Coho is kind of “in between.” It is smaller than King, but bigger than small ones like Red Salmon. It is called silver because of the lack of black spots on the skin. It has less fat. Less orange compared to King and Sockeye.
#4 Red Salmon
I like Red Salmon as much as King. It has nice fat content second to salmon considering it is smaller than the king. As for the flavor, to me it tastes more intense, and nice umami. Maybe concentrated. I have not seen farm raised red salmon so I am guessing you can only get wild one. Great to make sushi grade.
#5 Pink Salmon
It is the smallest of all, thus has the least amount of fat. Mostly it is used for canned salmon. I haven’t had it for sushi or sashimi, and have not seen this in the price list from the fish companies, or served at a restaurant. Supposedly because of its lower fat content, the commercial value is low, which is the reason it is mainly used for canning.
For sushi and sashimi, my first choice is King, then Red Salmon, followed by Atlantic. The reason is that King Salmon just tastes the best to me. It has nice fat and deep salmon flavor. Red Salmon distinctive concentrated flavor (at least that is what tastes to me). Atlantic for me is hit and miss. Because I like King and Sockeye, farmed Atlantic tastes bland.
Now, you chose the salmon, the next thing is to cure it.
1. Curing
There are mainly two types of curing techniques used for sushi fish: salt curing and vinegar curing. Curing is a process of “preservation and flavoring process.”(Science of cooking). Both salt and vinegar kill and reduce the amount of bacteria that is outside of the fish. Vinegar curing reduces the “fishy” smell, and puts its flesh in a similar condition as “cooked.” Salt curing adds a salty taste to fish. When combined with sugar, it will add a sweet taste.
Smoking is another curling technique to kill bacteria. However, the smoking method described in this recipe using the smoke gun does not necessarily kill the bacteria. It is used to mainly add a smoky flavor to the salmon.
Ingredients
Salmon (skin off)
Sea Salt
Sugar
Lemon peel or zest (optional)
Tools Sheet pan or plate
Instructions:
Sprinkle sugar on the sheet pan.
Place the salmon to coat the entire outer layer with sugar using your hands.
Let salmon sit until water starts to come out from the salmon. The time to cure in sugar varies depending on the size of the salmon. If it’s a small block or steak size around 450g/1lb, it should take about 10-20 minutes. If it is a filet, then 30-45 minutes depending on the type of salmon. The more oil the salmon has, the longer it takes.
Rinse the salmon in water. Pat dry with paper towels.
Sprinkle salt on the sheet pan.
Place the salmon to coat the entire outer layer with salt using your hands.
Let salmon sit for about the half the time it took curing with sugar.
Rinse the salmon in water. Pat dry with paper towels.
Optional: Place the salmon in a bag, inject smoke using the smoke gun. Close the bag.
Place the bag in the refrigerator for 30 minutes to one hour.
Now you cured your salmon, let’s freeze it. The reason you want to cure first, then freeze is curing takes out some water from the flesh of salmon. When the salmon flesh has less water, it has a less chance of forming bigger crystals when freezing, thus preventing the “drip” when thaw. The “drip” is the loss of water during thawing. What we call flavor is combination of taste and smell, which is contained in the water within the cell of salmon flesh. The forming of the crystal breaks the outer layer of cells, causing the water that contains flavor to loose. So, by curing first, we are reducing the amount of water in the flesh but keeping the flavor.
2. Freezing
Wild salmon come with parasites such as anisakis. To kill parasites, Salmon must be frozen. How long? It is stated in the FDA page. To simplify, it takes approximately 24 hours in a commercial freezer, or 7 days in a home freezer. So, if you go sportfishin and catch salmon, you must freeze it for about 7 days to make it sushi grade. Some farm raised Salmon such as Ora King from New Zealand is parasite free. If the Salmon you are purchasing is parasite free, then no freezing is required. Make sure to ask the fishmonger when you buy farm raised salmon.
3. Thaw in Your Fridge
Once the salmon is frozen, thaw it slowly in your fridge. The slower thawing process enhances the flavor and maintains the fish's delicate texture.
Smoking
This method is not the full smoke as you would with smoked salmon. This is more of an instant smoke. The main aim is to add smoke flavor. I do not believe this method will kill or reduce the bacteria on the outlier of the fish.
To quick smoke, use a small smoke gun that fits in your hand. There are many types of these smoke guns available online. Click here.
Instructions:
Place your thawed salmon on a metal wire rack on a sheet pan, or a plate.
Place the sheet pan in a plastic bag (small trash bag would work).
Insert the tip of the smoke gun into the plastic bag.
Inject smoke until the bag is filled.
Close the bag, place it in the refrigerator for at least 30 minutes.
Remove the salmon from the bag. Slice for sushi or sashimi.
Mastering the art of curing salmon for sushi and sashimi will undoubtedly elevate your homemade sushi experience. Remember to follow the steps carefully and use high-quality ingredients like Ora King Salmon for the best results. With practice, you'll be able to create wonderful sushi dishes that will impress and delight your guests.
Happy sushi-making!


Breakthrough Sushi offers corporate, private and public sushi classes in the San Francisco Bay Area using sustainable fish.
To see the schedule for upcoming public classes, please click here.
If you like to inquire about corporate or private sushi classes and catering, please email your inquiry here.


